Setup
Before we start programming the Pico 2, we need to set up our development environment with the right tools. This chapter covers everything you need to get started.
Picotool
picotool is a tool for working with RP2040/RP2350 binaries, and interacting with RP2040/RP2350 devices when they are in BOOTSEL mode.
Here's a quick summary of the steps:
# Install dependencies
sudo apt install build-essential pkg-config libusb-1.0-0-dev cmake

mkdir embedded && cd embedded

# Clone the Pico SDK
git clone https://github.com/raspberrypi/pico-sdk
cd pico-sdk
git submodule update --init lib/mbedtls
cd ../

# Set the environment variable for the Pico SDK
PICO_SDK_PATH=/MY_PATH/embedded/pico-sdk

# Clone the Picotool repository
git clone https://github.com/raspberrypi/picotool
Build and install Picotool:
cd picotool
mkdir build && cd build
cmake -DPICO_SDK_PATH=/MY_PATH/embedded/pico-sdk/ ../
make -j8
sudo make install
On Linux you can add udev rules in order to run picotool without sudo:
cd ../
# In picotool cloned directory
sudo cp udev/60-picotool.rules /etc/udev/rules.d/
Rust Targets
To build and deploy Rust code for the RP2350 chip, you'll need to add the appropriate targets:
rustup target add thumbv8m.main-none-eabihf
rustup target add riscv32imac-unknown-none-elf
probe-rs - Flashing and Debugging Tool
probe-rs is a modern, Rust-native toolchain for flashing and debugging embedded devices. It supports ARM and RISC-V targets and works directly with hardware debug probes. When you use a Debug Probe with the Pico 2, probe-rs is the tool you rely on for both flashing firmware and debugging.
Install probe-rs using the official installer script:
curl -LsSf https://github.com/probe-rs/probe-rs/releases/latest/download/probe-rs-tools-installer.sh | shFor latest installation instructions, better refer to the official probe-rs documentation.
udev Rules for Linux
By default, debug probes on Linux can only be accessed with root privileges. To avoid using sudo for every command, you should install the appropriate udev rules.
- 1.Download the udev rules file
- 2.Copy it to
/etc/udev/rules.d/ - 3.Reload udev rules with
sudo udevadm control --reload - 4.Unplug and replug your Debug Probe
Quick Start
Before diving into theory, let's jump straight into action. Here's a simple code to turn on the onboard LED of the Pico 2.
We'll use Embassy, a Rust framework built for microcontrollers like the Raspberry Pi Pico 2. Embassy lets you write async code that can handle multiple tasks at the same time.
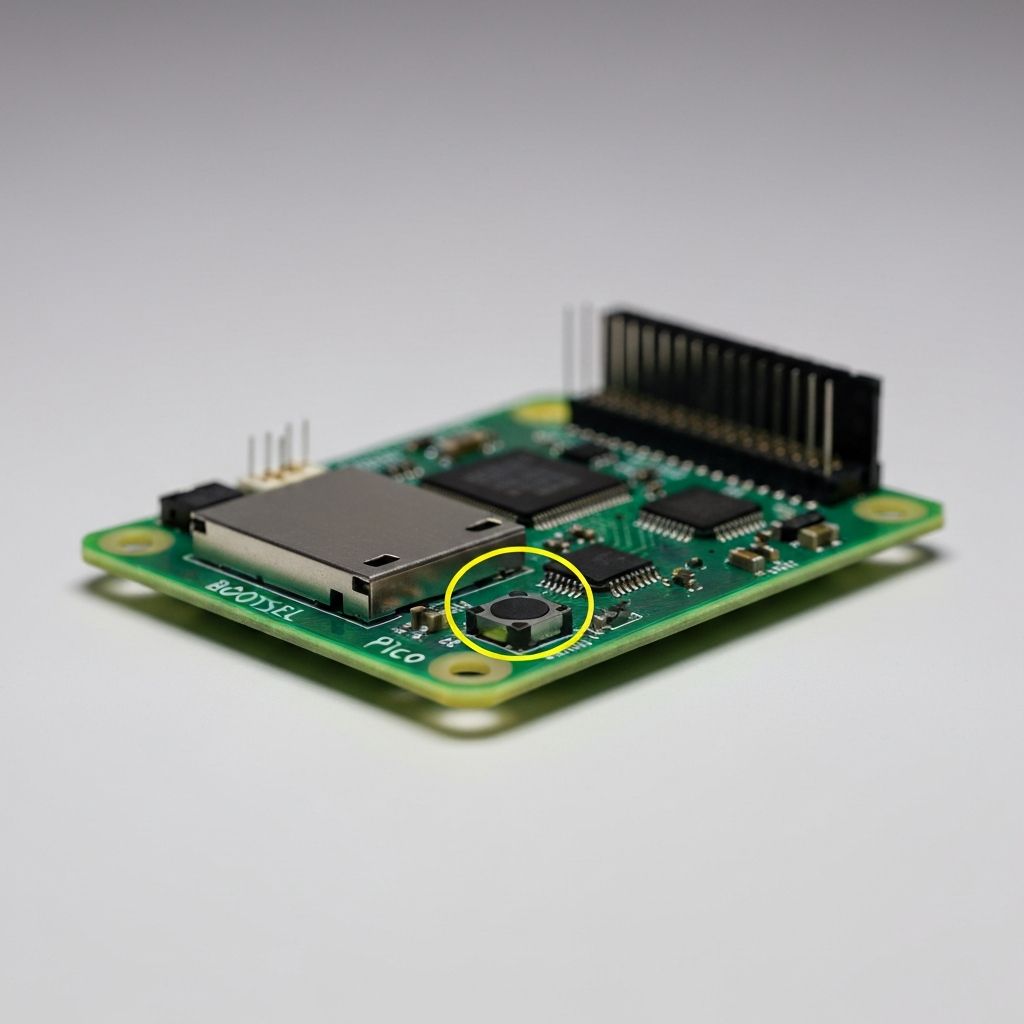
Press BOOTSEL while connecting USB
#[embassy_executor::main]
async fn main(_spawner: Spawner) {
    let p = embassy_rp::init(Default::default());

    // The onboard LED is connected to pin 25
    let mut led = Output::new(p.PIN_25, Level::Low);

    loop {
        led.set_high(); // Turn on the LED
        Timer::after_millis(500).await;

        led.set_low(); // Turn off the LED
        Timer::after_millis(500).await;
    }
}
Clone the Quick Start Project
git clone https://github.com/ImplFerris/pico2-quick
cd pico2-quick
cargo run
If successful, you should see the onboard LED blinking at regular intervals!
Quick Start - Pico 2 W LED Blink
Pico 2 W Specific Code: On the Pico 2 W, the onboard LED (GPIO25) is controlled by the CYW43439 wireless chip, not directly by the RP2350. This means we need to initialize the wireless driver even just to blink the LED.
This is different from the standard Pico 2, where you can control GPIO25 directly. All Pico 2 W examples must use the cyw43 driver for LED control.
We'll use Embassy, a Rust framework built for microcontrollers like the Raspberry Pi Pico 2. Embassy provides async support and includes the cyw43 driver needed for the Pico 2 W's wireless features.
Press BOOTSEL while connecting USB
use cyw43_pio::PioSpi;
use defmt::*;
use embassy_executor::Spawner;
use embassy_rp::bind_interrupts;
use embassy_rp::gpio::{Level, Output};
use embassy_rp::peripherals::{DMA_CH0, PIO0};
use embassy_rp::pio::{InterruptHandler, Pio};
use embassy_time::Timer;
use static_cell::StaticCell;
use {defmt_rtt as _, panic_probe as _};

bind_interrupts!(struct Irqs {
    PIO0_IRQ_0 => InterruptHandler<PIO0>;
});

#[embassy_executor::main]
async fn main(_spawner: Spawner) {
    let p = embassy_rp::init(Default::default());

    // Initialize the PIO for CYW43 communication
    let Pio { mut common, sm0, .. } = Pio::new(p.PIO0, Irqs);

    // Set up the CYW43 driver for wireless chip communication
    let pwr = Output::new(p.PIN_23, Level::Low);
    let cs = Output::new(p.PIN_25, Level::High);
    let mut pio_spi = PioSpi::new(
        &mut common,
        sm0,
        p.DMA_CH0,
        p.PIN_24, // DIO
        p.PIN_29, // CLK
        p.PIN_25, // CS
    );

    // Initialize the CYW43 state
    static STATE: StaticCell<cyw43::State> = StaticCell::new();
    let state = STATE.init(cyw43::State::new());

    let (net_device, mut control, runner) = cyw43::new(state, pwr, pio_spi, fw).await;

    // Now we can control the LED through the CYW43 chip
    loop {
        control.gpio_set(0, true).await;  // Turn on LED
        Timer::after_millis(500).await;

        control.gpio_set(0, false).await; // Turn off LED
        Timer::after_millis(500).await;
    }
}
Dependencies for Pico 2 W
Add these dependencies to your Cargo.toml:
[dependencies]
embassy-executor = { version = "0.6.4", features = ["arch-cortex-m", "executor-thread"] }
embassy-rp = { version = "0.3.0", features = ["rp2350"] }
embassy-time = "0.3.2"
cyw43 = "0.2.0"
cyw43-pio = "0.2.0"
static_cell = "2.1.0"
defmt = "0.3"
defmt-rtt = "0.4"
panic-probe = { version = "0.3", features = ["print-defmt"] }Simplified Example Repository: The full Pico 2 W setup requires firmware loading and additional configuration. For a complete working example, clone the Embassy examples repository:
git clone https://github.com/embassy-rs/embassy
cd embassy/examples/rp235x
cargo run --bin blinky_wifi --release
If successful, you should see the onboard LED blinking on your Pico 2 W!