Debug Probe for Raspberry Pi Pico 2
Pressing the BOOTSEL button every time you want to flash a new program is annoying. The Pico 2 does not have automatic bootloader mode, but you can get the same convenience and even more capability by using a debug probe.
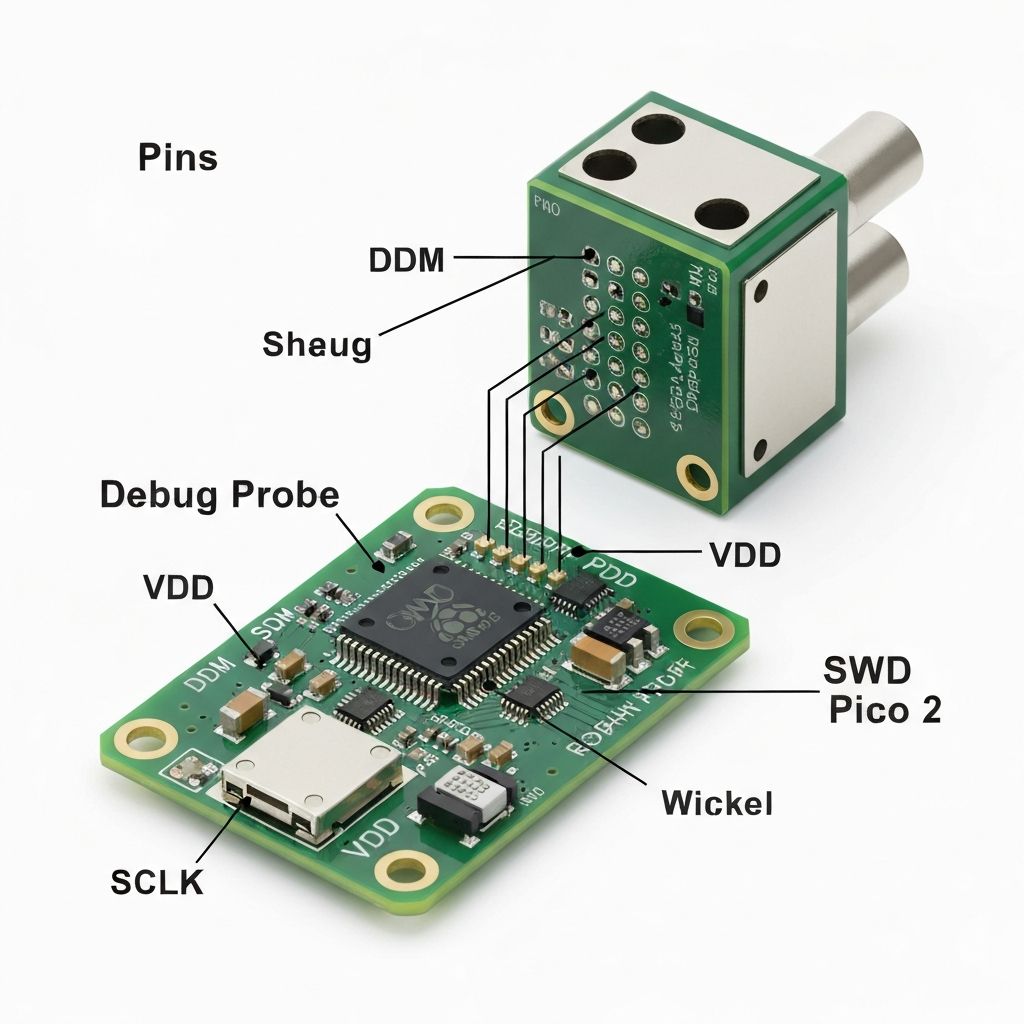
Debug Probe connected with Pico 2
Raspberry Pi Debug Probe
The Raspberry Pi Debug Probe is the official tool recommended for SWD debugging on the Pico and Pico 2. It is a small USB device that acts as a CMSIS-DAP adapter. CMSIS-DAP is an open standard for debuggers that lets your computer talk to microcontrollers using the SWD protocol.
The probe provides two main features:
1. SWD (Serial Wire Debug) interface
This connects to the Pico's debug pins and is used to flash firmware and perform real time debugging. You can set breakpoints, inspect variables, and debug your program just like you would in a normal desktop application.
2. UART bridge
This provides a USB to serial connection so you can view console output or communicate with the board.
Soldering SWD Pins
Before you can connect the Debug Probe to the Pico 2, you need to make the SWD pins accessible. These pins are located at the bottom edge of the Pico board, in a small 3-pin debug header separate from the main GPIO pins.
Connecting Pico with Debug Probe
The Debug Probe has two ports on its side: D port for SWD (debug) connection and U port for UART (serial) connection.
SWD Connection (Required)
Use the JST to Dupont cable that comes with your Debug Probe.
| Probe Wire | Pico 2 Pin |
|---|---|
| Orange | SWCLK |
| Black | GND |
| Yellow | SWDIO |
UART Connection (Optional)
The UART connection is useful if you want to see serial output (like println! logs from Rust) in your computer's terminal.
| Probe Wire | Pico 2 Pin | Physical Pin |
|---|---|---|
| Yellow | GP0 (TX) | Pin 1 |
| Orange | GP1 (RX) | Pin 2 |
| Black | GND | Pin 3 |
Test Your Setup
Once everything is connected, test your setup with these commands:
# Flash your program
cargo flash --release

# Flash and view RTT logs
cargo embed --release
No more BOOTSEL button pressing! You can now flash and debug directly.
Real-Time Transfer (RTT)
When developing embedded systems, you need a way to see what's happening inside your program. Real-Time Transfer (RTT) solves this problem by letting you print debug messages and logs from your microcontroller to your computer.
What is RTT?
RTT is a communication method that lets your microcontroller send messages to your computer through the debug probe. It creates special memory buffers on your microcontroller, and the debug probe reads these buffers to display messages on your computer. This happens in the background while your program runs normally.
Using Defmt for Logging
Defmt (short for "deferred formatting") is a logging framework designed specifically for resource-constrained devices like microcontrollers. Your Pico sends small codes instead of full text messages, keeping your firmware small and fast.
use defmt::{info, warn, error};

info!("Starting program");
warn!("You shall not pass!");
error!("Something went wrong!");
Add these dependencies to your Cargo.toml:
defmt = "1.0.1"
defmt-rtt = "1.0"
panic-probe = { version = "1.0", features = ["print-defmt"] }
Then include them in your code:
use defmt_rtt as _;
use panic_probe as _;cargo embed. This command automatically opens an RTT session and shows the logs in your terminal.Now you have professional-grade debugging and logging for your Pico 2 projects!